Search This Blog

Thursday, June 30, 2016

Cherry Frozen Mousse for One


It’s summertime, and the cherries are everywhere. I love them, and I may have bought too many. Here’s a good treat for when your cherries are starting to fade but are still flavorful and lovely. Oh, and if you can’t wait for it to freeze, it’s still wonderful!

4 ounces (about 1/4 package) silken tofu
¾ cup pitted and frozen cherries
½ teaspoon maple syrup, agave nectar, or confectioner’s sugar (regular sugar will make it grainy)
  1.  Chop the cherries a bit, to make the work of the food processor a little lighter.
  2. Place all the ingredients into a food processor or blender and whirl until it’s well combined and creamy.
  3. Place into a freezer-happy vessel and let it freeze for ½ an hour to 1 hour.


Enjoy topped with fresh fruit and a sprig of mint! Or maybe some chocolate chunks or chocolate sauce.
Note: This recipe makes about ¾ cup, about half-again what’s shown in these photos.

Variations:

This would be great with blueberries instead of cherries, or try blackberries, strawberries, or even plums, peaches, or nectarines! 

Monday, June 27, 2016

Peach Cobbler for One


It’s summer and the stone fruits are plentiful. This little pie is quick and easy, so you can get right to the important part—eating it—right away!
For the Filling:
2 large ripe peaches, pitted and sliced
1/2 TBLSP maple syrup
1 teaspoon arrowroot powder
½ teaspoon vanilla
Sprinkle of ground cinnamon
For the Topping:
1 TBLSP almond milk (or other non-dairy milk)
Squeeze of lemon juice from a wedge
½ cup plus 2 TBS:P all-purpose flour
1/3 teaspoon baking powder
Sprinkle of cinnamon
Pinch of baking soda
Pinch of salt
1 TBLSP coconut oil, melted (or use vegan butter)
Slosh of maple syrup

Preheat the oven to 350 degrees Fahrenheit.
Make the Filling:
  1. In a small bowl (I use a cereal bowl), combine peaches, maple syrup, arrowroot, vanilla, and cinnamon. You could also do this right in the baking dish—I use a single-serving casserole dish that’s about 5-inches across.

Make the Topping:
  1. In a small bowl, combine the milk and lemon juice to make a buttermilk. Set it aside to curdle.
  2. In another small bowl (I use another cereal bowl), combine the flour, baking powder, cinnamon, and baking soda.
  3. Drizzle the coconut oil (or butter) over the top of the dry ingredients and work it in with a wooden spoon or your fingers until all of the flour is moist.
  4. Add the curdled milk and the maple syrup, and stir until just combined.

Assemble the Cobbler:
  1. Sprinkle the toping over the filling. It’s sort of clumpy and lumpy, which is something to rejoice in.
  2. Bake for 20-25 minutes, until the fruit is bubbling and the topping is golden brown around the edges.
  3. Let it rest for 10 minutes before gobbling it down like tomorrow is a fasting day. It’s great served with a nice blop of vegan ice cream—seen here with Soy Delicious Snickerdoodle. 


Monday, June 20, 2016

Apricot Glaze or Barbecue Sauce for One


Do you ever have a hankering for barbecue sauce and you’re allergic to tomatoes (on which most sauces are based)? Slosh this sweet and tangy sauce on tofu, slabs of seitan, steamed veggies, or, as seen here, on cauliflower florets or tofu. Yum!

3 TBLSP apricot preserves
2 TBLSP miso (yellow or white)
2 TBLSP rice vinegar
2 TBLSP soy sauce or tamari
1 clove garlic, diced small
½ inch fresh ginger, peeled and diced small
  1. In a small saucepan, whisk together the ingredients (preserves, miso, vinegar, soy sauce, garlic, and ginger.
  2. Heat the sauce until it boils, then turn down the temperature and, stirring often, reduce until it’s fairly thick. This might take 5 minutes, but probably not that long, and it’s sugar in there, so lurk and stir often.

 If you're putting this sauce over cauliflower or other roasted veggies:
  1. Get the cauliflower or other veggie in the oven and roasting for 10-20 minutes, until they’re fork-tender, at a reasonable heat, such as 350 degrees Fahrenheit. I like to line the baking pan with aluminum foil to make clean-up easier.
  2. When the veggies are fork-tender, turn the oven up to 450 degrees Fahrenheit, slosh some sauce onto everything and then bake for 10-12 minutes.
  3. Pull the baking sheet out again, flip everyone over, and bake for another 10-12 minutes. The sauce should be making sizzling noises and have turned a darker shade of brown.

Serve with a refreshing salad. Seen here is a purple rice and zucchini salad, recipe coming soon!

I also like this over fried tofu , and in this case (see photo), I combined the cauliflower with fried tofu, some green beans, and some cut fresh apricots. Yummy!

Fried Tofu
1 package firm tofu, about 14 ounces
2 teaspoons flax seed meal
2 teaspoons water
3 TBLSP cornstarch
Pinch of baking powder
Pinch of salt
More water
Oil for frying
  1. Cut the slab of firm tofu in half length-wise and press it between two plates for 15 minutes or so, while the waffle iron is heating up. My iron has plates that can be turned over for smooth sided tofu (which is easier to clean up) or for the traditional waffle pattern (which is fun and holds more sauce).
  2. Meanwhile, mix the flax seed meal with 2 teaspoons of water in a small bowl.
  3. In a larger bowl, one big enough to put the tofu into, combine the cornstarch, baking powder, and salt, and heave in the flax seed meal, which should now be a viscous glop. If the mixture is fairly thick, add water until it’s more like pancake batter. You’ll probably need 3 or 4 TBLSP of water.
  4. Heat the oil in a deep pan—about ¾ of an inch will do it. It doesn’t need to deep fry.
  5. Cut the ironed tofu into nice cubes and place them gently into your batter, sloshing them around a bit to coat all the sides.
  6. Fry the tofu in the oil in a loose layer—if they touch, they will stick to each other, which makes them easier to turn over, but not as much fun to serve. You might need several batches. Fry them until they’re golden brown on all sides.
  7. Put the fried tofu cubes on some paper towels to absorb some of the oil.

If you’re saucing these, don’t chuck ‘em into the oven with the veggies or they’ll get soggy. Save some of the sauce and pour it over the tofu when you’ve balanced it artfully on top of your glazed veggies. 

Monday, June 13, 2016

White Chocolate Cake with Apricots for One


Are you in the mood for something fabulous? Well hold onto your girdle, Mabel, because this cake will knock off more than just your socks!

For the Cake:
1 cup all-purpose flour
2 teaspoons baking powder
Pinch salt
½ cup granulated sugar
¼ cup canola oil
¾ cup almond milk (or other non-dairy milk)
1 teaspoon vanilla extract
½ TBLSP apple cider vinegar
6 ½ TBLSP white chocolate, melted (about 3 ½ ounces)
For the Frosting:
12 TBLSP vegan butter (3/4 cup)
2 3/4 cup confectioner’s sugar  
Large slosh of vanilla extract
9 ½ TBLSP white chocolate, melted (5-6 ounces)
For the Assembly:
2 TBLSP water
1 TBLSP granulated sugar
2 apricots, pitted and thinly sliced
¼ cup walnuts, finely chopped

Make the Cake:
Preheat the oven to 350 degrees Fahrenheit. Spray two single-serving cake pans with baking spray or line with parchment and spray (preferred). My baking pans are really two casserole-for-one-sized pans, about 5-inches across.
  1. In a medium bowl, combine the flour, baking powder, salt, and sugar.
  2. Add in the oil, milk, vanilla, vinegar, and melted white chocolate. Beat this combination until it’s quite smooth. No lumps!
  3. Divide the mixture between the two prepared cake pans.
  4. Bake for 25-30 minutes, until a toothpick comes out clean and the top springs back when touched.
  5. Cool on a rack until completely room temperature (or colder—setting it in the refrigerator for 20 minutes after they’re mostly cooled will speed this process up). Remove them from the pans to speed things up, but wait 30 minutes after taking ‘em out of the oven or they will be too fragile and will shatter into several pieces.
Make the Frosting:
  1. In a small bowl, combine the butter and sugar until completely smooth.
  2. Add in the vanilla extract and melted white chocolate and beat the whole mishegas until it’s fluffy and unctuous.
  3. Refrigerate until spreadable. Be careful not to leave it in there too long or you’ll have to beat the daylights out of it to get it spreadable again.

Make the Assembly Components:
  1. Boil the water and sugar in a small saucepan over medium heat, stirring constantly to dissolve sugar. Set aside to cool a bit.

Assemble the Cake:
I like to do this on a plate resting on top of an overturned mug so it’s at a more comfortable height.
  1. Using a serrated knife, slice each cake layer horizontally in half so that you have four layers of approximately the same thickness. (You may have to trim any bulging tops, too.)
  2. First Layer: I like to do this on a plate resting on top of an overturned mug so it’s at a more comfortable height.Place one layer, cut side up, on the serving dish. Brush the syrup you made in the Assembly Layer step on top of the cake.
    • Spread a thin layer of the frosting on top of the syrup and dot the frosting with sliced apricots. 
  3. Second Layer: Spread a thin layer of frosting on the uncut side of the next layer and turn it upside-down on top of the previous layer so that the frosting touches the apricots.
    • Repeat the syrup, frosting, apricot treatment on the uncut top of that second layer, and then repeat the whole “underside” frosting of the third layer, setting it on top of the second layer.
  4. Third Layer: Repeat the syrup, frosting, apricot treatment on top of that third layer, slather the underside of the fourth layer (which should be the cut side) and set it on top of the third layer.
  5. Fourth Layer: Spread some more syrup and then the frosting on the top and down the sides of the cake. It should be a very thin layer—the crumb coat.
  6. Refrigerate for 1 hour.
  7. Spread the remaining frosting luxuriously all over the rest of the cake. It doesn’t have to be too tidy on the sides because you’re going to cover it with walnuts.
  8. Press chopped walnuts into the sides of the cake.
  9. Cover the top with the sliced apricots in an artful way, and slather them with the remaining syrup. (You may have extra syrup.)
  10. Refrigerate for one hour.
  11. Let it come to room temperature for 2-3 hours before devouring like a bear just awakened from a winter nap.

You might want to share this one with friends—It’s not large in diameter, but it’s super rich and it’s HUGE!


Monday, June 6, 2016

Zucchini and Corn Fritters for One


It’s summer, and I’ve got zucchini coming out of my ears! And I’ve got ears of corn! (See what I did there?) After I’ve had my fill of it steamed and raw, it’s time to start playing with my food. Here’s the result of one such happy moment in time.

½ cup plus 2 TBLSP shredded zucchini
1 ½ TBLSP corn kernels (frozen and thawed is fine, fresh is better, canned will do)
2 ¼ TBLSP almond butter, tahini, or peanut butter
2 TBLSP flour (I use all-purpose, but any gluten-free will do just as well)
¼ teaspoon garlic powder
¼ teaspoon onion powder
Pinch sea salt
Ground black pepper to taste

Cover a baking sheet with parchment paper.
  1. Place the zucchini in a strainer and put a couple of paper towels on top. Press down hard, and squeeze out the water. When it seems dry, wrap the zucchini in more paper towels and squeeze some more. You’ll be surprised how much water is in there.
  2. Put the dried zucchini in a small bowl. Add the corn and nut butter, stirring to combine.
  3. In another small bowl, combine the flour, garlic and onion powders, salt, and pepper, and stir until it’s well mixed.
  4. Add the flour mixture to the zucchini and moosh it together until it forms a nicely homogenous glob. The result should be moist and sticky.
  5. Divide the resulting glop into three or four balls and flatten them into patties, about ½-inch thick. Place on the prepared baking sheet and set them to rest in the refrigerator for 30 minutes.


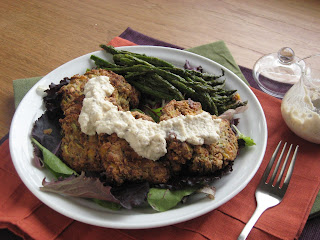
This is a good time to make the sauce. I’ve used a nice lemon and pepper sauce (recipe below) for this photo, but ranch dressing, pineapple salad dressing, pesto, or just about any savory sauce or salad dressing would be nice.

Preheat the oven to 400 degrees Fahrenheit.
  1. Bake the patties for 20-25 minutes. Use a spatula (because these little guys are delicate still), and flip them over. Bake for another 10-15 minutes, depending on whether you want them crispy or not. They will be a lovely golden brown color.

Let them cool for a few minutes before serving to increase their sturdiness.


Creamy Lemon Sauce for One
This tangy and creamy sauce goes great with fritters, but try it on noodles or rice, as a dip for crudités, onion rings, or chips, or on a pile of steamed vegetables.
2 TBLSP raw cashews boiled in water for 20 minutes
½ TBLSP fresh lemon juice
1-2 TBLSP water, as needed
Pinch onion powder
Pinch ground black pepper
Pinch sea salt
  1. Place the drained cashews in a blender or food processor, add the remaining ingredients, and whirl until it’s a smooth sauce. This will take a couple of minutes, with several pauses to scrape down the sides and such.

This sauce thickens if you put it in the refrigerator. That’s a good thing if you want your sauce thick. If you want it thinner, or to re-thin it after a refrigerator adventure, just add a little water and stir.


Thursday, June 2, 2016

Zucchini and Banana Muffins for One


This quick bread will make your head explode with happiness. It’s fast, it’s made from ordinary things, and it tastes spectacular. Try it! 

½ cup grated zucchini
½ ripe banana (about 2 or 3 inches), mashed
2 ½ TBLSP applesauce
2 ½ TBLSP brown sugar
2 teaspoons vegetable oil
Squeeze of lemon juice
Slosh of vanilla extract
½ cup all-purpose flour
Pinch baking soda
Pinch baking powder
Shake ground cinnamon
Shake nutmeg
Shake ground cloves
Pinch salt
Pinch granulated sugar for topping
Pinch cinnamon for topping

Preheat oven to 350 degrees Fahrenheit. Grease or line 4 muffin cups with paper liners
  1. In a small bowl, combine zucchini, banana, applesauce, brown sugar, oil, lemon juice, and vanilla.
  2. In another small bowl, whisk together flour, baking soda, baking powder, cinnamon, nutmeg, salt, and cloves.
  3. Add flour mixture to zucchini, and stir until just barely combined.
  4. Spoon batter into muffin cups about ¾ full.
  5. In a small bowl, combine the sugar and cinnamon and sprinkle over the batter.
  6. Bake for 30 minutes, or until a toothpick comes out clean.

Serve naked and fabulous, or top with a little vegan cream cheese or a blop of your favorite jam.

Variations:
  • This recipe makes four muffins, so why not spoon two of them into muffin tins just as they are, and then add 1 TBLSP raisins and 1 TBLSP walnut pieces to the remaining half.
  • Try it with a small handful of chocolate chips for a sweeter offering.
  • Use brown sugar instead of the cinnamon and sugar topping for a crispier crust.